Introduction
TronLink, similar to MetaMask, allows TRON DApp to run in the browser without deploying TRON FullNodes. If the user has installed TronLink in the Chrome extension, then TronLink will inject tronWeb and tronLink objects into each browser page. This will allow the web DApp to interact with the TRON network.
Let's look at it with a simple example.
Note:The demo in this article needs to rely on the development software or an HTTP server to run through the access side. Take the development software WebStorm as an example, click on the browser to visit the demo page.

<!DOCTYPE html>
<html lang="en">
  <head>
    <meta charset="UTF-8" />
    <title>TronLink Demo</title>
  </head>
  <body>
    <h2>TronLink Detection Demo</h2>
    <script>
      window.addEventListener("TIP6963:announceProvider", (e) => {
        // Check if the announced provider is TronLink
        if (e.detail.info && e.detail.info.name === "TronLink") {
          alert("You have TronLink installed!");
        }
      });

      // Request all TIP-6963 wallets to announce themselves
      window.dispatchEvent(new Event("TIP6963:requestProvider"));
    </script>
  </body>
</html>
Please refer to the TronWeb documentation for other functions provided by TronWeb.
New Variable Description
Note:TronLink chrome v3.22.0 starts to support TronLink object injection. TronLink APP (Android and iOS versions) will start to support TronLink object injection in v4.3.4.
interface tronLinkParams{
  ready: Bool; //Initialize to false, true after user authorization
  request: (args: any): any => {};// The method of tuning plugins for dapp website
  sunWeb: sunWeb;
  tronWeb: tronWeb;
}

window.tronLink <tronLinkParams>;


## Example

window.tronLink = {
  ready: true,
  request: function(){}, // Plugin custom call entry method
  sunWeb: sunWeb,
  tronWeb: tronWeb;
}
User Authorization
Raise the authorization box so that users can authorize account information to the DApp website
interface requestAccountsResponse{
  code: Number, // 200:ok 4000:in queue, no need to repeat commit, 4001:user rejected
  message: String
}

const res: requestAccountsResponse = await tronLink.request({method: 'tron_requestAccounts'})| code_Number | Description |
|---|---|
| 200 | User's acceptance of authorization |
| 4000 | In the queue, no need to duplicate commits |
| 4001 | User's refusal to authorization |
Signing
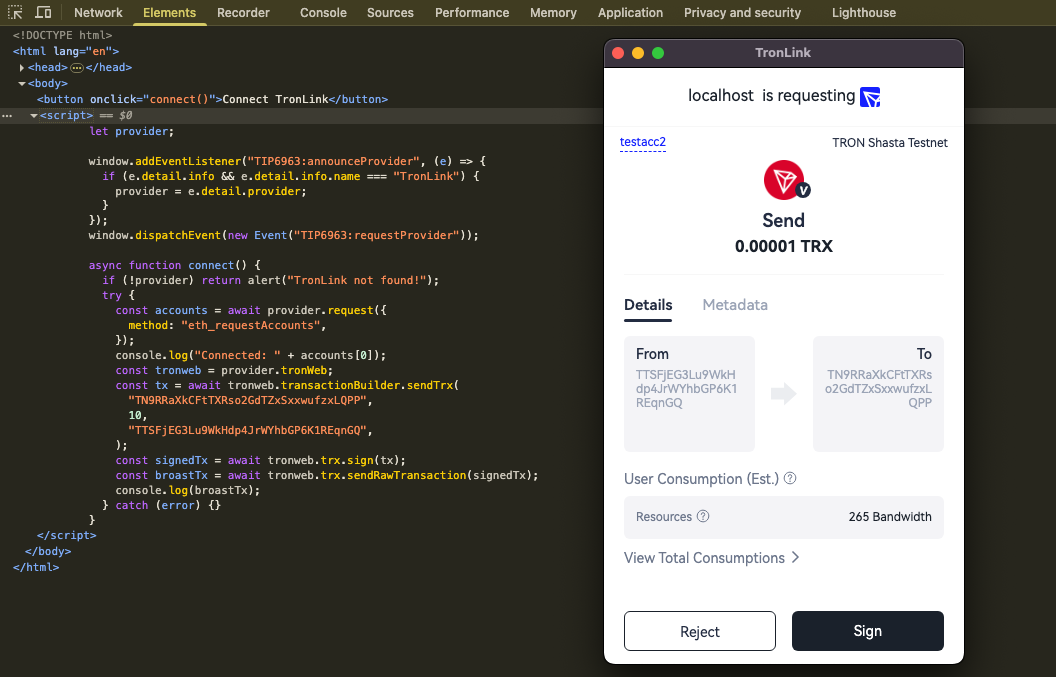
In the process of completing a transaction, TronWeb needs to get TronLink to sign it. The signing process is done in TronLink, and then the signed transaction is returned to TronWeb for broadcast. Let's understand it by an example.
<!DOCTYPE html>
<html lang="en">
  <head>
    <meta charset="UTF-8" />
    <title>TronLink Demo</title>
  </head>
  <body>
    <button onclick="connect()">Connect TronLink</button>
    <script>
      let provider;

      window.addEventListener("TIP6963:announceProvider", (e) => {
        if (e.detail.info && e.detail.info.name === "TronLink") {
          provider = e.detail.provider;
        }
      });
      window.dispatchEvent(new Event("TIP6963:requestProvider"));

      async function connect() {
        if (!provider) return alert("TronLink not found!");
        try {
          const accounts = await provider.request({
            method: "eth_requestAccounts",
          });
          console.log("Connected: " + accounts[0]);
          const tronweb = provider.tronWeb;
          const tx = await tronweb.transactionBuilder.sendTrx(
            "TN9RRaXkCFtTXRso2GdTZxSxxwufzxLQPP",
            10,
            "TTSFjEG3Lu9WkHdp4JrWYhbGP6K1REqnGQ",
          );
          const signedTx = await tronweb.trx.sign(tx);
          const broastTx = await tronweb.trx.sendRawTransaction(signedTx);
          console.log(broastTx);
        } catch (error) {}
      }
    </script>
  </body>
</html>
When executing the code to tronweb.trx.sign(tx), TronLink will pop up a window to confirm the signature.
Please refer to the TronWeb documentation for other functions provided by TronWeb.